The rubber attachment is a vital part of the slingshot: A bad one kills your bands, makes the slingshot inaccurate or can be downright dangerous! Be sure to choose one that fits your kind of bands and slingshot.
The following page will show you quite a lot - eighteen, to be precise- ways to connect the bands. However, experience has shown that many shooters will, over the years, start using some variation of three attachment methods, with another two methods being used from time to time. So if you are a beginner, take my advice and choose one of the three I recommend!
1. It is safe
Any attachment method can be safe or unsafe, depending on the way it is done. My advice is to use only rubber and string to tie the bands, and stay away from wire and heavy objects such as clamps, or even steel balls inserted in tubular bands (we'll cover that later). Always imagine what happens when the bands break - and they will, eventually, and you'll never know where exactly- and what these broken bands can propel in your direction -usually all the stuff you used for attaching.
2. It doesn't destroy the bands
Rubber bands hate sharp edges. Imagine how the bands will move forward during the shot, and what parts of the slingshot may get in touch with them. Are there any sharp edges which might cut the rubber? Is enough place between the forks to go through? Will there be a sharp kink in the bands when it reaches its forward position? If you use tubular rubber, remember that it automatically gets a kink when it flies forward and the attachment forces the ends to stay out towards the shooter. There are three ways to counter it - rotating prongs, attachment to a flexible part (like a leather loop) or fly-over design. You can also minimize the effect by using a wide fork, or putting a piece of strong rubber tube around, like the Saunders Falcon does.
3. It takes stress away from the band's edges
Nature's law dictates that the outermost edges of an extended rubber experience more stress than the inner "core". This is especially true with broad flatbands. Put such bands in a rigid vice and the edges will fail soon. There two ways to alleviate this problem: You can the spread stress over a larger area of the rubber. This often has the added effect to take away stress from the attachment point itself, which makes the slingshot more secure and band changes easier: You can also fold the edges of the bands in. Naturally, this is always the case with tubular rubber.
4. It is flexible
A flexible attachment improves band life and accuracy. My experience has shown that the bands must be flexible along the horizontal axis is more important for two reasons: First, you will never extend the bands in a perfect 90° angle to your handle (unless your slingshot is very custom-tailored to you). Second, your hand and wrist will always move during the shot, forcing the bands to change their angle towards the slingshot. Flexibility also improves the handling characteristics and makes the slingshot easier to carry in a pocket, as the bands can fold along the handle.
I definitely recommend you use "Over the top", some variation of the Spain-style or the traditional Chinese attachment method. You can also use the "Around the fork" method to attach flatbands to commecially made slingshots, and the "African style" or "Tie-down" variation when you don't want to to spend too much time carving.
Works with: Cubic, tubular and flat bands
Doesn't work well with: Very broad flatbands
Advantages: Flexible, bands only get in contact with leather loop.
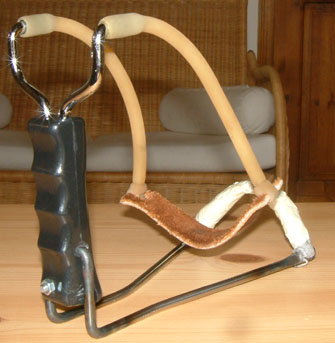
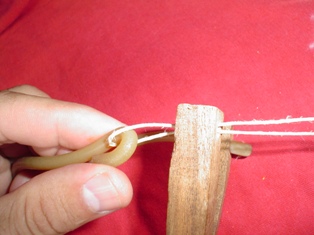
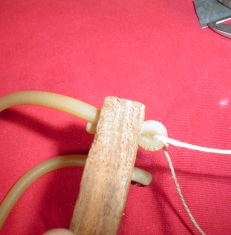
The motivation behind this attachment method is simple: Put a loop of string or leather between bands and slingshot, to give the bands the desired flexibility. The classic "Spain style" is, as you may have guessed, highly popular in Spain, and gave name to this whole class of attachments:
Left: The classic Spain Style slingshot has a small leather loop that comes out of the slingshot's top. The leather is held in place by forcing small wooden spikes into the attachment hole - read the instructions how to make it. A very nice method, but I would not use it for very heavy-pull bands, as the small leather strip cannot withstand too much force. It is highly recommended for normal bands. The bands fly fowawrd freely above the fork, which enhances accuracy, results in a smooth shooting behaviour and the fork ends don't obstruct your view to the target.
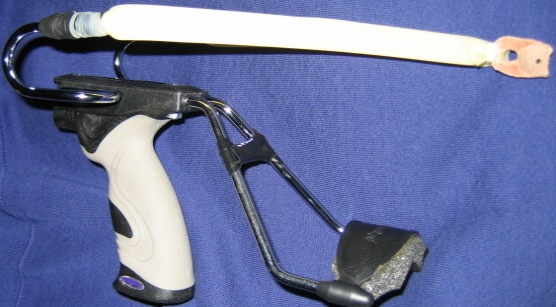
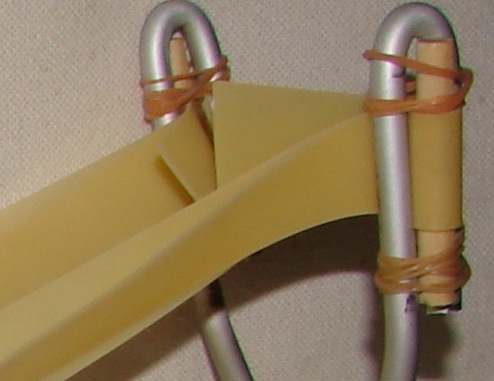
2nd: This is a my personal favourite for steel-frame slingshots: Simple leave the ends straight, and connect paracord loops. You can do this by keeping the loops long enough and fasten them along the whole fork lenght with rubber bands and / or rubber tube. It is extremely simple to make - no need to care too much about a smooth fork end, no complicated bending.. Thanks to Geko for this nice invention.
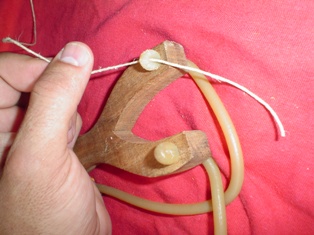
3d: Marco Angulo had the idea to use a similar variant that attaches the leather loop on the rearside of the slingshot. It's easy to make and can be used with strong bands.
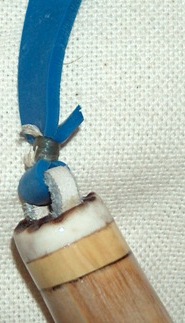
Right: There's a large number of other variations possible: Tubular bands can be attached by inserting the leather piece into the tubes's hole, then winding string around. You picture above shows a veriant that is very pupular in Czech Republic - a flat leather peice attached to the top with a screw. It works great, but make 100% sure that the bands won't pull out the screw.
Works with: Double or quadruple cubic and tubular bands
Doesn't work well with: Broad flatbands, single bands
Advantages: Flexible, force is spread over the whole front area
Disadvantages: Only works with dual / quadruple bands, relatively complicated bending is necessary
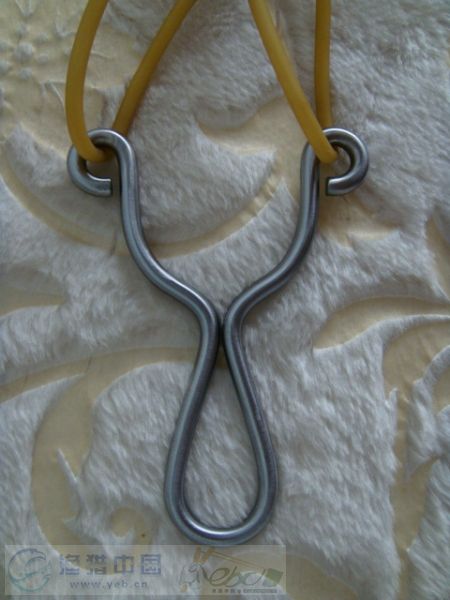
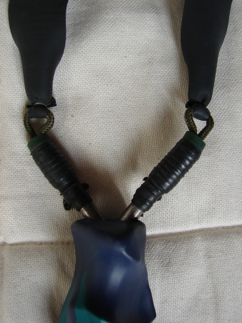
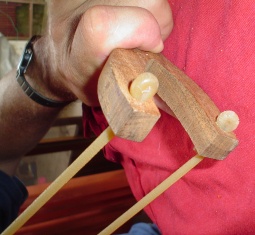
The Chinese slingshot shooters almost exclusively use this kind of attachment, and regard it as the best method. And indeed, it has some advantages that make it very interesting. First, it is very gentle to the bands. They can fly forward freely, and the force is spread ofer a relatively wide attachment area. This is espacially good when you make the slingshot out of round metal rod. Another plus is the very compact desgn, the slingshot remains flat and the bands can run down the handle when you store it in the pocket.
Give this attachment a close look when you are planning to use small-diameter latex tubing and make the slingshot out of metal rod.
Works with: Every kind of rubber, especially flat bands
Advantages: Flexible, force is spread overy a broad area, not much force on attachment point itself
Disadvantages: Fork end must be well-made and smooth
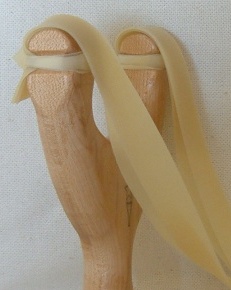
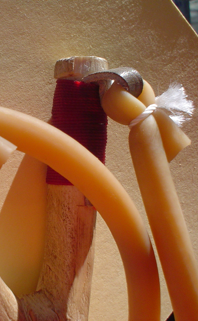
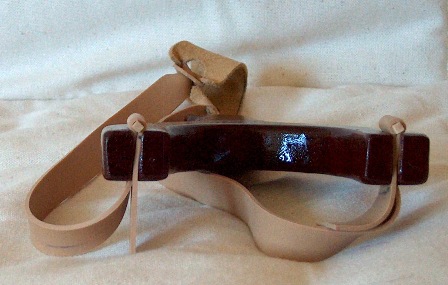
There's an ample number of people saying this is the best attachment method. The bands are flexible, can fly forward freely and their ends can be used like a mouse pointer to aim at the target. Take a look at the picture, you can see how the bands are attached with some rubber that sits in a groove. Tying correctly is important, so please read the tying instructions to see how it is done. It is no problem to use bands that are even wider than the fork end, they will simply overlap and work just as well. The only disadvantage is that the fork ends must be rounded and sanded well.
Works with: Tubular, cubic, not-too broad flatbands
Works not so well with: Broad flatbands
Advantages: Very simple to make, not much carving work necessary
Disadvantages: Bands must be kept quite long
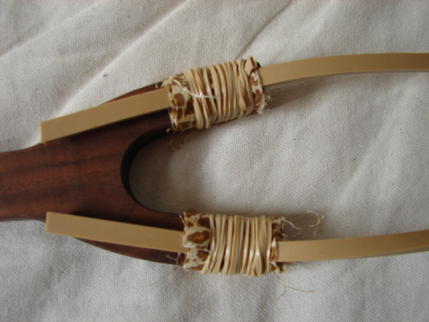
This slightly altered "over the top" method is particularly popular in Africa. The trick is that you attach the bands on the rearside of the slingshot, and pull them against the tying material. Use generous amounts of rubber bands to fasten the bands, and add cushioning cloth around the band. The result is a slingshot that exhibits similar performance as a "shoot over" model, without having to care too much about the fork end's smoothness. The rubber-wound fork ends are easy to hold without much carving work necessary. A proper "African style" attachment is quite comparable to the "Over the top" method, only that the rubber bands bend over tightly wound rubber instead of the fork ends. I personally feel that the sight picture is not as good as with "Over the top", but Italian tournament shooters use this method to compete to the highest levels, so it sure is a good way to attach the bands.
This is a bit like the African style, as the band will be pressed against the tying string, not against the fork, when you pull the bands. So use string with big diameter, paracord works fine. Don't use rubber to tie - it will expand and pop off the fork! You can leave the fork itself relatively unprocessed, with sharp edges on the fork end. So this is a very good method when you have a forked branch and want to turn it into a slingshot quickly, without too much carving work. Another advantage is that the bands are held downwards, along the handle, which results in a very compact design, perfect for carrying aroung. Again, the shoot-over design is more flexible, and recommended when you have time for whittling and sanding.
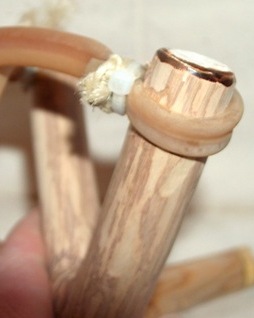
Cut a groove around the fork end, put the rubber around and tie. You have to smoothen the fork ends careefully. The stress is spread over the whole fork front, but the attachment is not flexible, the bands don't fold down and tend to rotate when you shoot, making adjustments necessary. You can use this attachment with tree forks that don't allow the rubber to run above the fork tip. I recommend you to use some "Spain style" or "African style" variation instead of this method..
Works with Tubes only
Advantage: Easy to make commercially.
Disadvantages: More complicated than it looks, not flexible, needs band protectors / rotating prongs to work well
This is by far the most common way for commercial slingshots. You can simply push an alcohol-moistened tube on the end of a steel or plastic rod, the bands will stay in place after drying. The diameter of the fork end must be at least 150% of the inner diameter of the rubber tube - for example, a 6mm fork end can accomodate tubing with 4mm inner diameter. This is attachment can be made in an automated process, which very efficient for mass production.Many beginners also think that its lack of complicated parts make it easy to make, but they are wrong: The fork ends wil kill your bands in no time umless they are very carefully rounded and polished. And even then, they are harsh to the bands, although manufacturers to make it better by adding plastic tip protectors, polishing the ends, adding protective sleeves or -the best way- make the prongs rotating. The better commercial models are quite succesful with this attachment method but there is, in my opinion, no reason to choose it for a homemade slingshot.
Works with Flatbands only
Advantage: Takes stress from band's edges
This is a good way to attach flat bands to commercial slingshots that were made for tubular bands. You must wind generous amounts of rubber tightly around the band to secure it. Flatbands are by nature far more flexible than tubes, and this attachment also takes stress from their edges, so it actually works pretty good. But I'd still prefer a really flexible attachment.
Works with: not-too broad flatbands, also tubes (depends on slot size etc)
Advantages: Very easy to adjust band length or change bands
Disadvantages: Fork ends often obstruct the view to the target, not flexible in horizontal plane, shooters often experience shifting bands, slots must be rounded well
Cut two narrow slots inside the fork end. They must be half as thin as the band is. Then, grind away the sharp edges, and be sure that the wood is strong enough to withstand the pulling force. This method keeps the bands parallel to each other, and is quite popular for flat bands. Disadvantage is that the rubber inside the slot may slowly move upwards with each shot, and the slot size limits you to specific bands: Too slim and they slip out, too big and they don't fit in.
Works with: not-too broad flatbands
Advantages: Very easy to adjust band length or change bands, bands
Disadvantages: Fork ends often obstruct the view to the target, not flexible in horizontal plane, shooters often experience shifting bands, slots must be rounded well
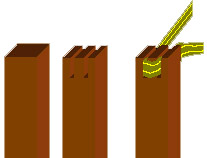
This method was used on famous slingshots like the Tinker Killdeer or the Scopeshot. Cut a slot in the middle of the fork. It should be about 2mm deeper than the rubber is broad, and shall be as wide as the rubber is. Grind away the edges to make the bands last longer. Then, take a rubber, fold back about 2cm and insert a small piece of wood (a matchstick, for example) in the loop. The piece of wood should be at least as strong as the slit is wide! Then, extend the rubber af far as you can and insert it into the slot. It is a nice method - really easy to make, very reliable, the bands are always 90 degrees to the shooting axis (making the shot more powerful and accurate) and replacing the rubber is done in seconds. Disadvantage is that the rubber inside the slot may slowly move upwards with each shot, and the slot size limits you to specific bands: Too slim and they slip out, too big and they don't fit in.
This method squeezes the rubber in place, thus preventing it from wandering along the slot: Keep the slot so wide that the bands would slip out. Instead of a matchstick, use something larger, like a piece of a pencil. Then, wind rubber bands around the fork and pencil piece. This builds up enough pressure to fasten the bands. Not slipping out is possible. Plus, you can use a large array of band sizes, can change bands in seconds, adjust pull length easily, bands are held parallel and you can poke a needle into the pencil piece to get a sight. But you're still not flexible along the horizontal axis. Plus, there's quite a lot of stress on the outer edges of the bands.
Works with: Any kind of band
Advantages: Very easy to adjust band length or change bands
Disadvantages: Works only with certain types slingshots (e.g. models made of flat steel)
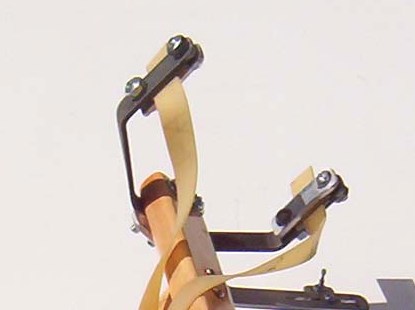
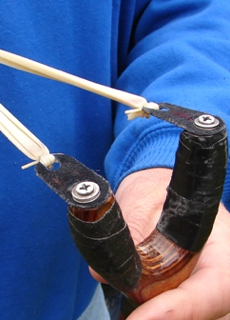
Another excellent way, if the slingshot material permits to employ it: Simply squeeze the end of the bands between two fork end parts, by means of two screws. Cushioning with leather or rubber enhances band life. It is simple, secure, the bands are straight and can be changed in seconds. Both tubular and flat bands can be attached this way.
Works with: Tubes
Advantages: Very compact, easy to change bandlength, bands stand straight back (good for fast reloading)
Disadvantages: Dangerous! Risk of severe injuries if things go wrong. Use with caution. Only for metal slingshots. Requires carful drilling and sanding.
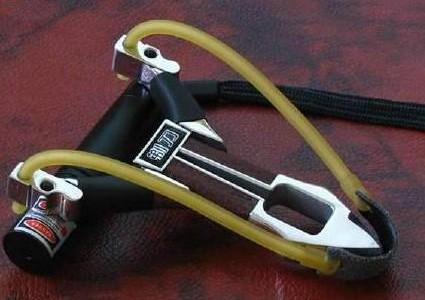
It is possible to attach tubular rubber to a slingshot by pushing the bands through a hole in the end of the fork and insert something (usually a metal bb) into the tubes. It looks neat and doesn't need much space on the fork end, which makes it popular on small pocket slingshots. Saw very thin slots from the edge to the holes in the fork end and you can insert pre-made band assemblies in a few seconds by pulling the bands taut and inserting then through the slots. It is a good idea to countersink the hole fron the front side, this lets the BB sink a bit deeper into the slingshot's frame and decreases the chance that the bands slip out of the slot.
This method works well, but has some grave disadvantages: First, the holes need to be well rounded and polished to keep the bands intact. Second - and most important - the bands will fly straight to your face with an inserted BB if the fork ends break or the bands manage to slip through the hole or the slot. Daisy Mfg. had to start a big recall of slingshots using this type of attachment because the attachment failed and led to several severe injuries.
So I don't recommend this method, unless you really know what you are doing, and trust the material your slingshot is made of. Always take a BB with a larger diameter than that of the holes.
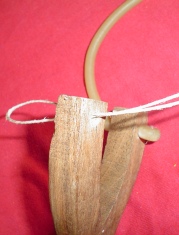
This method works with tubular and solid bands. As in the pics above, pull a rubber loop through the hole by using string. This attachment is particulary popular in Mexico (thanks, Marco!)